

This is the proper way to adjust for a proper burn. Make more power, get better gas milage. Keep your engine alive!
Please check your oxygen sensor before attempting to fix this. See the oxygen sensor technote for more.
You need to make absolutely sure you have no vacuum leaks and a good clean air filter before you do this. You need to fix all your nagging idle issues before you adjust your air/fuel ratio.
Select your car – CIS, CIS-E or Digifant II. If you do not know which injection system you have, you may not want to be messing with this just yet…
Regular CIS
CIS cars have a frequency valve that gets turned on and off really dang fast. So, you need a dwell meter. But, I use a Craftsman Multimeter I bought at sears for $30. It can measure Duty Cycle in %. I will show how to do it with both kinds of meters here…
The other thing you need is a 3mm T-handle allen wrench for adjusting the mixture. it needs to have a very long shank to be able to reach all the way down there. If your car still has the aluminum plug there (rare) – you will need to drill it a bit, drill a screw in to grip the plug, and pull the whole plug/screw thing out with some pliers.
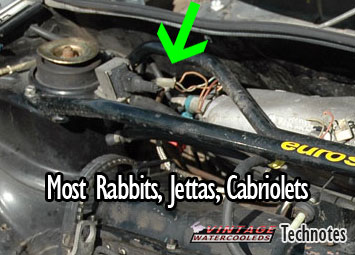
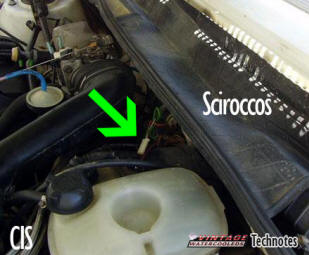
The connector you need to use is not in the same place in all cars, but you are looking for the same basic connector. It is white, with two leads in it.
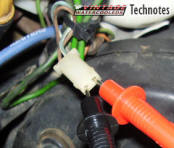
This is what the plug you are looking for looks like – it has 2 small wires connected to it – one brown and one blue with a white stripe. The Dwell Meter’s Green lead connects to the blue/white wire and the Dwell Meter’s Black gets connected to the brown. For the Multi-meter, it’s Black to brown and Red to blue/white.
Testing with a Dwell Meter
Start your car up, let warm up all the way. A good way to make sure it is all warmed up is to let it have run the radiator fan twice. Now turn the car off for a minute.
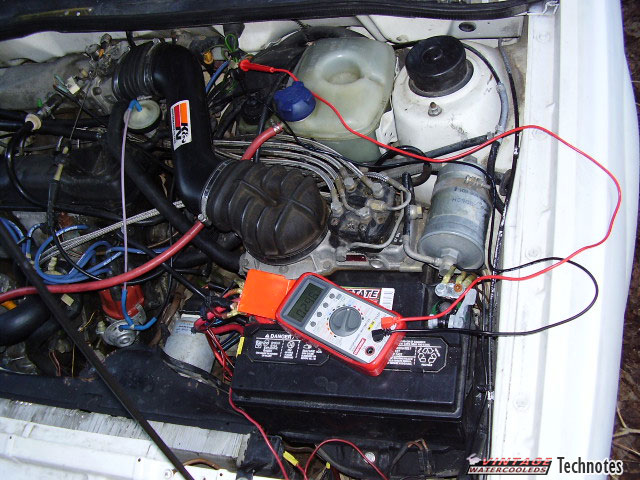
This part depends on how your meter connects. I used house wires to stuff into the connector, and then clipped the meter onto the ends. After you connect them, restart your car. Click the picture to make it bigger.
After you have your car started again, the dwell meter starts doing stuff. The needle should be sweeping about 10°. It needs to sweep in the area of 45° ± 7°. So if you are in between 38° and 52° – you are in the ideal range. If the reading is below 23° or above 59°, then you need to adjust the mixture. See the picture to the right for details… If your sweep is too wide, then you have problems like a bad oxygen sensor, bad grounds, or vacuum leaks. Fix that, then continue here.
If your needle is sweeping above 50°, then you are running too lean. If you are below 40°, then you are too rich. Running rich isn’t too bad except for burning too much fuel and some black smoke under acceleration. If rich running too much, you will destroy your catalytic converter Running lean is BAD, VERY BAD!! It can fry your valves and cook your pistons, and create all kinds of problems. It can actually make your exhaust manifold and catalytic converter glow red hot! If you are out of adjustment, continue on to the adjustment section below.
Digital Multimeter
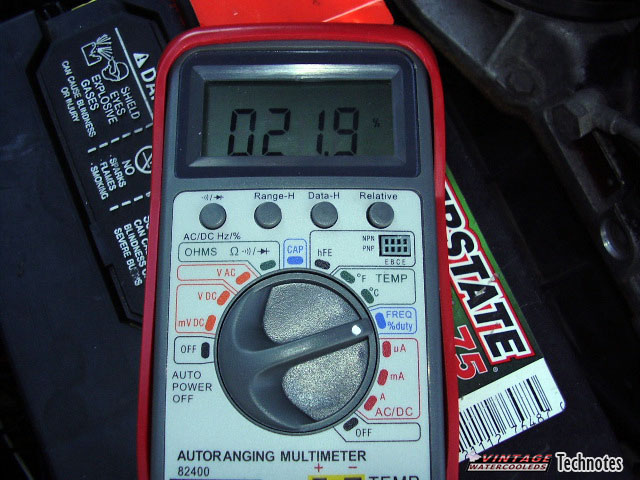
 This is my new preferred method. So again, hook up the meter to the test plug and restart the car. You should see the numbers flashing in percent on your meter. Click the picture to the right to enlarge. Note how mine is way off – I have a very large exhaust leak, so I’m gonna fix that and come back and update this section later with it. The Ideal specs are to be at 50% ± 8%. So, if you are going up and down between 42% and 58% – you are good. If you read below 25% or above 65% – you will want to adjust the mixture. If you are too low, you are running rich, too high – you are running lean. Adjust accordingly…
Adjusting the mixture
To adjust the mixture, turn the Allen screw clockwise to make the mixture more rich. Turn it counterclockwise to lean it out. Your allen screw in there could be dirty and full of evil black stuff – you will just have to turn the car and dig it out so you can turn it. When you turn it, you will need to push down a bit to get the pressure necessary to turn the screw. The car will almost, or just plain die when you do this – don’t worry – it’s just because the air metering plate is there and you pushed it down. Make a small adjustment and restart the car and try again from there.
CIS-E
What you need
CIS-E? you have it easy. All you need is a voltmeter that can measure amps. You can go to radio shack and get one for about $20, and it will even be digital! Cool.
Your test harness is not so easy. You need to make it out of Junior power timer connectors so you can test in-line with your DPR (Differential Pressure Regulator). Mk1 Sciroccos have the male JPT connectors on their turn signals, but these are rare. Female JPT connectors are everywhere, 99% of cars made after 1990 or so have them as fuel injector connectors, They are also known as Bosch connectors. Make yourself a harness as illustrated in this picture…
Last thing you need is a 3mm T-handle Allen wrench for adjusting the mixture. it needs to have a very long shank to be able to reach all the way down there. If your car still has the aluminum plug there (rare) – you will need to drill it a bit, drill a screw in to grip the plug, and pull the whole plug/screw thing out with some pliers.
Making your test harness
 This harness can be built yourself using new or junkyard parts. See the picture on the left to see what you need to make. Basically, your ammeter needs to go inline with one of the wires to the DPR. So – you need to add this chunk of harness in between the connector and the DPR itself to do that.
New Parts – I found a good site you can get these connectors on – http://www.eagleday.com/ampconnectors.html will fix you up. You need the two conductor Junior Timer AMP connectors. One male and one female. A digifant fuel rail also has the correct Connector. 3 wire oxygen sensors on late A2 and some Audis have a good two wire male AMP connector too.
Junkyard Parts – the female connector is easy – any car with EFI will have the female plugs connected to each of it’s fuel injectors. Male ones are much harder to find. You can find the male connector on the oxygen sensor wire of some cars.
Measuring the Air/Fuel Ratio
Start, and fully warm up your car. A good rule of thumb is the have the coolant fan have cycled on and off twice. Turn the car off, and connect your test harness in line with your DPR, and turn on your meter. Restart the car. The ideal value of current is 10mA ± 1mA. Adjust the air/fuel mixture if it is more than 6mA off of the spec.
(More coming soon! – I need to make a test harness and a 16v car to test!)
Adjusting the mixture
To adjust the mixture, turn the Allen screw clockwise to make the mixture more rich. Turn it counterclockwise to lean it out. Your allen screw in there could be dirty and full of evil black stuff – you will just have to turn the car and dig it out so you can turn it. When you turn it, you will need to push down a bit to get the pressure necessary to turn the screw. The car will almost, or just plain die when you do this – don’t worry – it’s just because the air metering plate is there and you pushed it down. Make a small adjustment and restart the car and try again from there.
Digifant II
Digifant II systems are far far more computer controlled, you should not ever have to adjust the air/fuel ratios with it. BUT – if you do – here’s how! You need a very accurate CO% meter that connects to the CO tap tube on the exhaust manifold, you can’t use a dwell meter or duty cycle meter for this at all. Measuring the CO tells you what the Air/Fuel ratio is.
OR, you can use a wideband oxygen sensor with a controller such as the Innovate LM-1 to display to tell you what the true A/F ratio is.
To adjust the air/fuel ratio, there is a plug on the MAF (Mass Airflow Sensor), you need to remove this plug. Then you can get to the 5mm adjustment scew.