
Why relay your headlights? What is a relay even? All of your questions are answered right here!

Relays make your headlights brighter by directly connecting them to the battery with a sort of remote switch called a Relay. It is a required modification for Scirocco II with European lights, the wires are different, and the wattages are higher.
US headlights on a lot of our cars have very low wattage, sometimes as low as 35watts. European headlights with H4 bulbs start out at 55 watts and can go above 120 watts per bulb. Stock wiring cannot handle this extra load. The way the headlight system works in a VW is for the power to go from the Battery to the fuse panel, through the load reduction relay, then up to the headlight switch, then all the way back out to the headlights.
A headlight relays system acts as a remotely controlled switch. Now the power runs from the battery to the relay to the headlight – a very short distance. The relay is told to turn on by the stock wiring. A relay uses far less current than the headlights do, taking a load off of your electrical system, and making your switch last longer.
How to Relay
Materials Required:
- 14 Gauge primary stranded wire in 3 colors of your choice – about 10 feet of each
- 18 or 20 gauge primary stranded wire in two colors of your choice – about 2 feet of each
- two or four Bosch-type relays (depending on the diagram that you choose)
- (Optional) a weather-tight enclosure for the relays
- Quick Disconnect 1/4″ terminals for the relays in Yellow, Blue, and Red sizes
- Headlight connectors that match your bulbs
- Fuse holders with the correct fuses for your wire
- (Optional) Loom of some sort to hold the wires together and to protect them
Tools required:
- Wire Cutter, Stripper and Crimper
- Wrench for your battery terminals to install power and ground wires
- (optional) Heat gun or Lighter if you use heat-shrink tubing
Check Matco Tools for the proper open barrel crimper for the non-unsulated OEM type of terminals. Around 2/10/08, it was about $25
The first thing is to plan your system. Are you using two or four headlights? The way to figure out how many amps your headlight system is going to draw, you need this equation: Watts / Volts = Amps
So, if I had two 60 watt bulbs running at 12v in my car, that would mean that I have 120 watts/12 volts, which makes 10 amps.
So that means that I can easily power the bulbs with just one relay. Not much of a sweat for it. But what if I had a mega-high powered system? One can get 90/100W h4 bulbs and 110 Watt H1s all on at the same time. That’s 420 Watts on at once – so that means 35 amps of power running through a relay. You could do this with one 40 amp relay, but many bosch-type relays are only 30 amps. If you buy 30 amp relays, you would have to use two of them, and divide the load between the two of them.
Wire and Wire Gauge Guide
It is important to use the correct type of wire for your harness. Do not use THHN or solid core wires for your harness. These are too coarse, and inflexible and will break in an automotive environment because car is moving a going over bumps all the time. Use Automotive Primary wire (called GPT) which is commonly available in auto parts stores. You can also order some higher quality wire of the GXL, TXL, and SXL types online. GXL is the cheapest (but it is better than GPT), TXL is in the middle, and SXL is the most expensive and highest quality. But for something like headlight wiring, it does not need to be the highest quality or performance – it’s not running over the engine – this is just lighting circuits.
It is important to select the correct wire gauge for your harness. Gauge means the size of the copper conductor in the wire, and a smaller number means a larger wire. It is useless to “overkill” here and use a larger wire than necessary. It will just be harder to build, more costly and less flexible.
Use this chart as a guide:
- 16 gauge: 22 amps
- 14 gauge: 32 amps
- 12 gauge: 41 amps
- 10 gauge: 55 amps
- 8 gauge: 73 amps
Wire Colors
VWs use Yellow for low-beams, White for high beams, and brown for grounds. You can use any colors you want on your harness, but be sure not to use the same color for all of them – you will pay for it later if you need to troubleshoot problems!
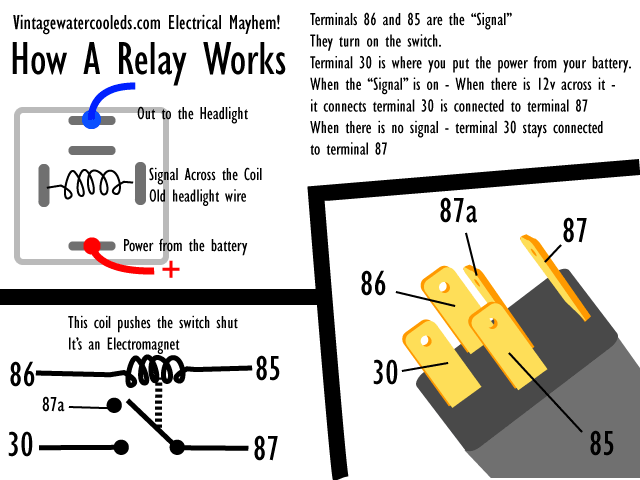
How a Relay Works
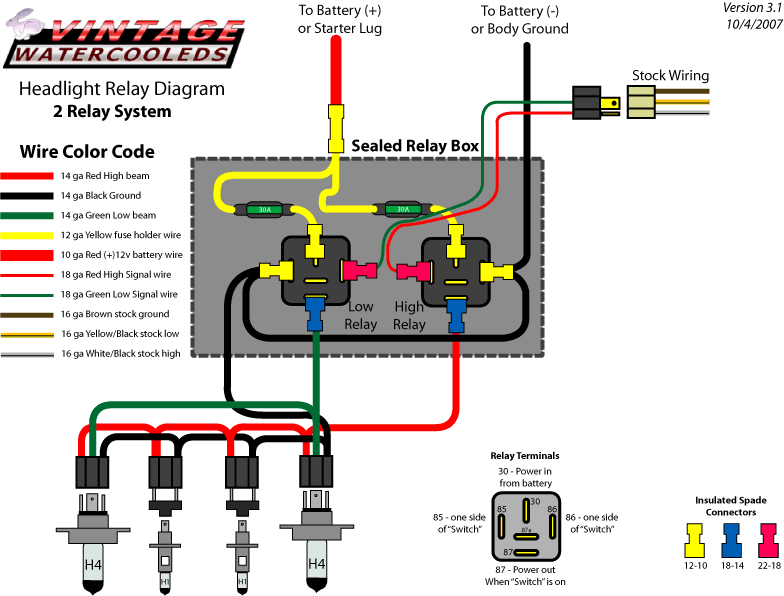
A relay is a remote switch. Terminals 85 and 86 are the trigger to that switch. If you put a voltage across there (like 12v from the old headlights on one side and ground on the other) then it will switch the relay. The polarity of 85 and 86 do not matter.
Terminal 30 always goes to the battery via a fuse. This is a DIN standard, and you may find other places in German cars that say 30 on them where power is connected. The load (your headlights) go on terminal 87. That’s where the power goes out when the relay is triggered.
Fuses
The fuse is very important, and makes sure you don’t set your new harness on fire if there’s a problem. Choose a fuse based on the capacity of the wire, not the load. A fuse just makes sure that the amount of current does not exceed the ratings of that wire. Bulbs can use more current as they age, so don’t fuse based on the wattage. Use the Wire gauge guide above, and pick the closest fuse below that max current rating.
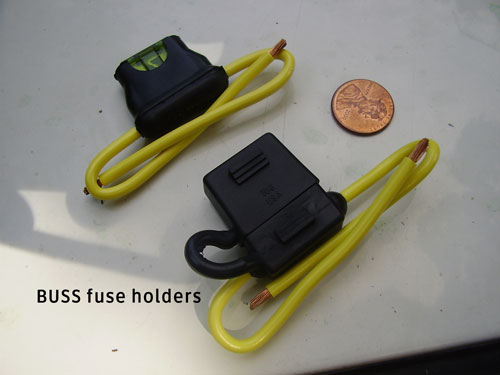
This picture shows two different BUSS fuses from an auto-parts store. They were the same price, but the one without the weather-proof cover did not include the 30A fuse. If you are using a weather tight box – don’t worry about getting the sealed type of fuse holder.
Whatever type you use, remember to fuse them to the smalles wires you are using.
Connectors
 H4 connectors use 3 prongs. They are slightly wider than normal spade prongs found elsewhere in the car. Sealed beams used on some cars are wired differently than H4 bulbs, even though the connector fits. This is what leads to the most obvious problem – when you can turn on your lights, but they glow dimly and don’t work well.
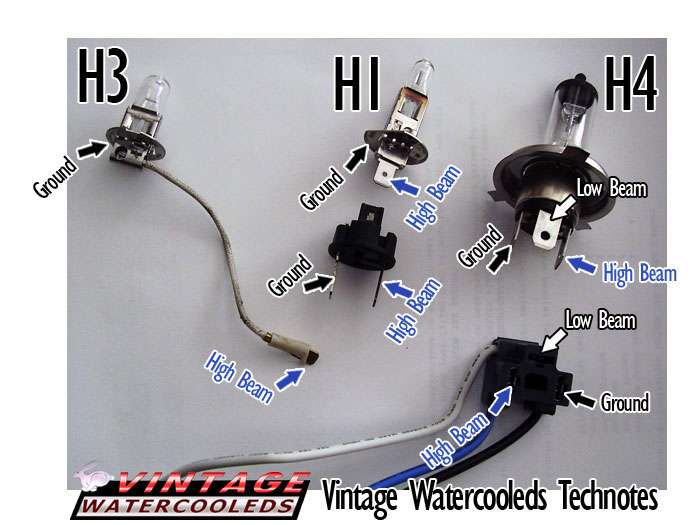
The diagram at right shows the proper wiring for H4, H3 and H1 bulbs. The H1 bulb shows a special adapter, this should come with your headlight housing, but it is optional.
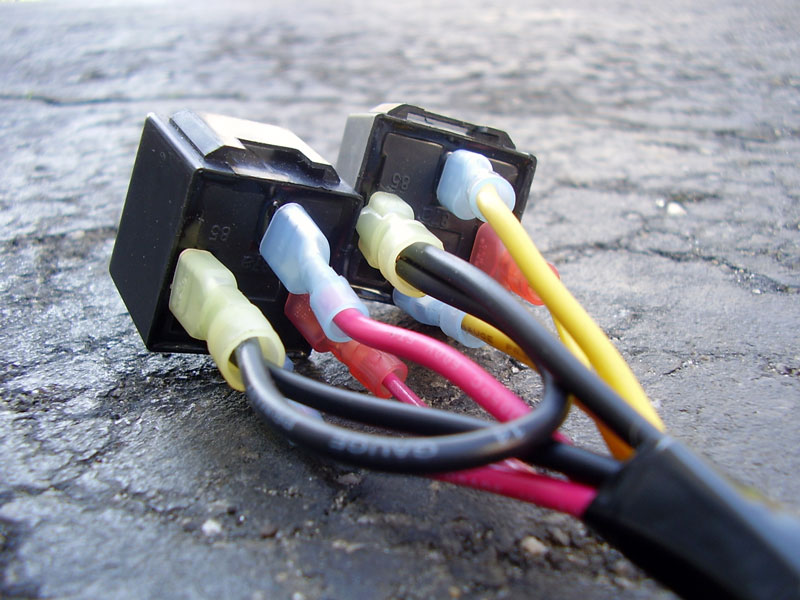
For the relays, I like to use Vinyl Insulated 1/4″ quick disconnect terminals. In the USA – these are extremely common, they can not only be found in auto-parts stores, but even general stores like Wal-Mart, K-Mart and other stores with car sections. These are easy to crimp, keep corrosion out, and get the job done.

You can also get special relay sockets, shown at right that take un-insulated quick disconnect terminals. These are common in German cars, and they are relatively easy to get, and make the relay box much cleaner.
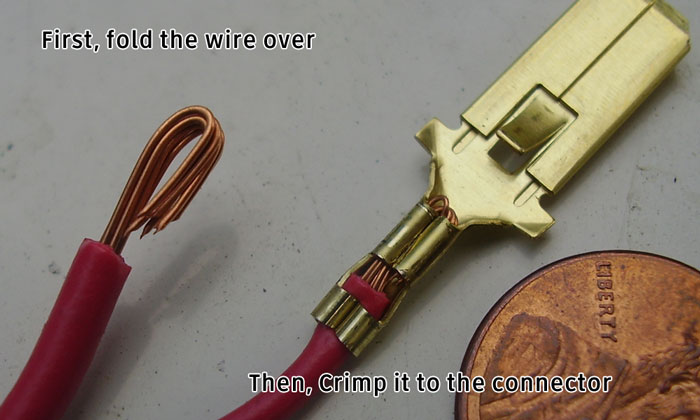
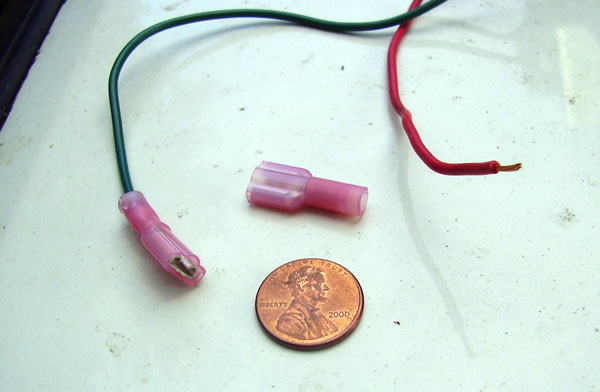
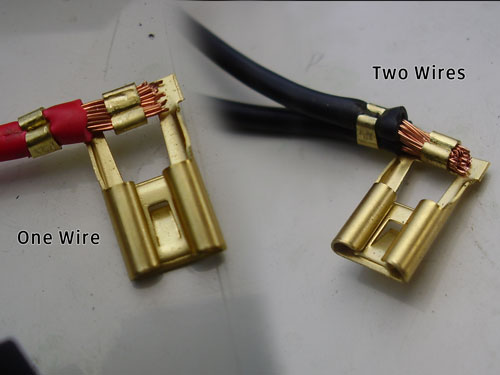
For the H4 headlight connectors, you can either buy H4 pigtailed connectors from the Auto-parts store and splice them to your new wires. If you buy a special double barrel crimper, you can use the uncrimped version for a cleaner install with no splices. If you do use pigtailed connectors, you can use uninsulated butt connectors and heat-shrink, or insulated connectors found in many stores. The pics at left show how to crimp with a double barrel crimper. Fold the wire over and crimp it for a better mechanical connection.
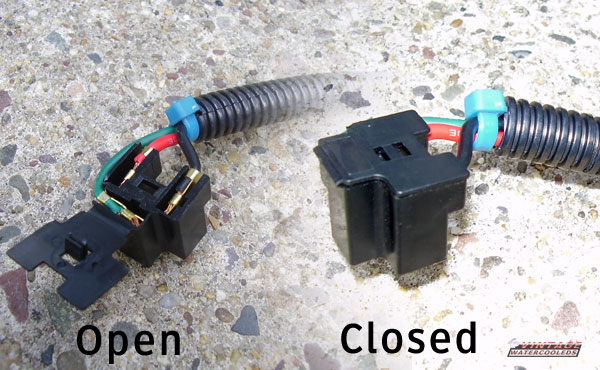
This picture shows how my H4 connectors work – they use flag type pins that slide in from behind, and then the cover closes to protect them.
There are many different versions available, but they all will work.
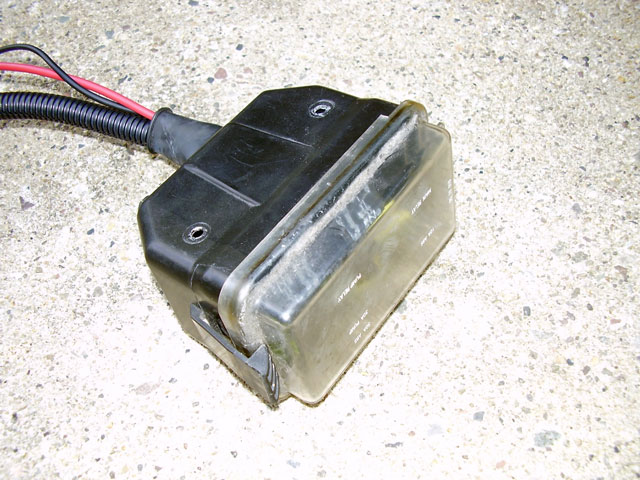
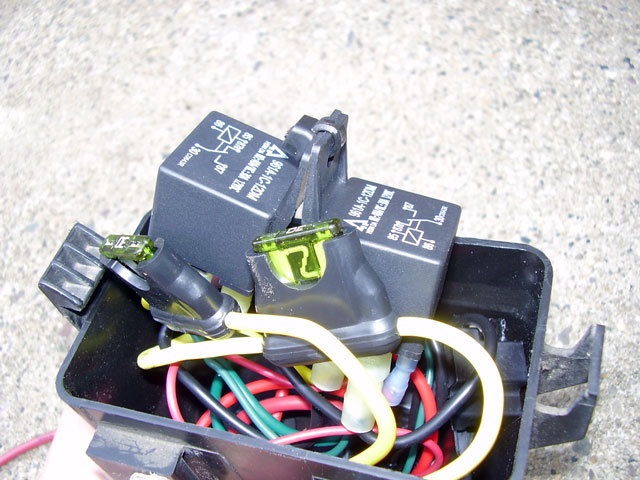
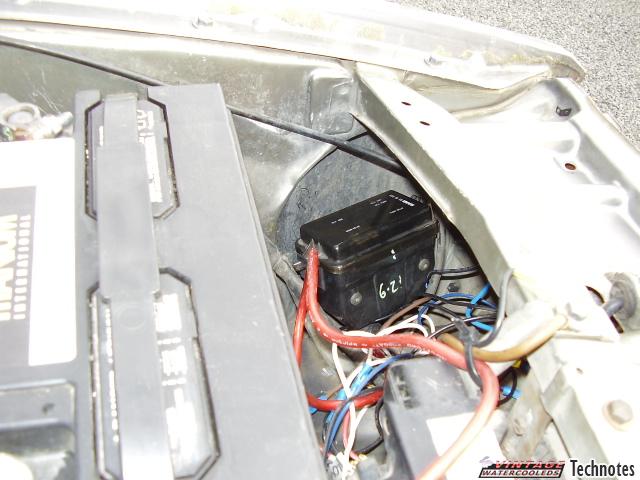
Relay Box
It’s a good idea to use a weather-tight relay box for your system. I’ve found that this box from the salvage yard works great. It’s the ABS relay box from Saab cars. On late 80s cars, it’s in the passenger’s side fender, behind the wheel well. In early 90s cars, it’s just to the left of the brake booster on the firewall. both types have brackets that have Torx screws. Remove the inards, and you have a weather-proof box that’s the perfect size!
Diagrams
Here are the diagrams
The first shows a two relay system with H1 bulbs connected with adapters that are on most headlights (most common)
The second shows a two relay system with H3 bulbs, connected with spades on the high beams
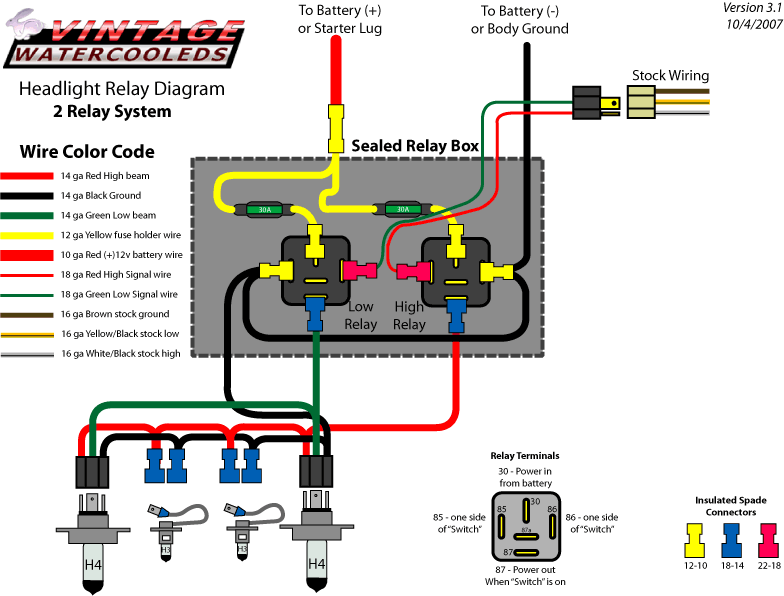
The Third shows a three relay system with H1 bulbs – this is good for really high power (>100Watt) systems
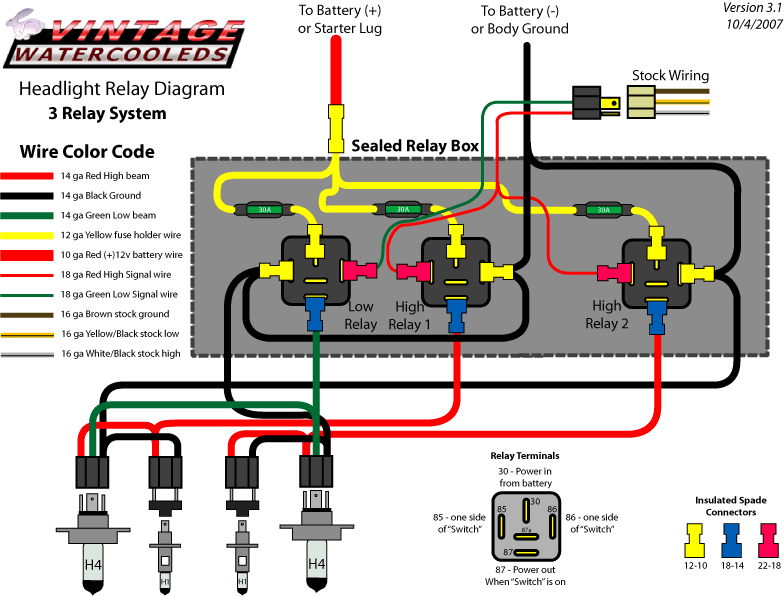
The fourth shows a three relay system with H3 bulbs with spade connectors – again, good for high power
OLD
These two diagrams are a bit older.
The first shows the most commonly used two relay system. This can handle most situations, but for a really high powered headlight system with all 4 bulbs using over 100 watts each, consider the 4 relay system.

